There’s something undeniably magical about homemade ravioli-the tender, pillowy pockets of pasta that cradle rich, flavorful fillings, transforming a simple meal into an unforgettable experience. Crafting perfect homemade ravioli is both an art and a labor of love, blending time-honored techniques with personal creativity. Whether you’re a seasoned cook seeking to refine your skills or a curious beginner eager to dive into the world of Italian cuisine, this step-by-step guide will walk you through every stage of the process. From mixing the ideal dough to sealing each ravioli with care, prepare to unlock the secrets to creating thes delightful parcels that promise a taste of tradition in every bite.
crafting Perfect Homemade Ravioli: A step-by-Step Guide
Crafting perfect homemade ravioli is a rewarding journey that elevates an everyday meal into a celebration of artisan skill and rich italian heritage. Originating from the northern regions of italy, ravioli has long been cherished for its tender, thin pasta envelopes cradling decadent fillings. Whether folding a cherished family recipe or creating contemporary variations, unlocking the secrets behind authentic dough, sumptuous fillings, and flawless cooking techniques will empower you to wow every palate at your table.
Prep and Cook Time
- Planning Time: 45 minutes
- Cook Time: 5-7 minutes
- Total Time: Approximately 52 minutes
Yield
Serves 4 as a hearty main course
Difficulty Level
Medium – perfect for adventurous cooks ready to master pasta artistry
Ingredients
- 2 cups all-purpose flour, sifted
- 3 large eggs, room temperature
- 1 tablespoon extra virgin olive oil
- 1/2 teaspoon fine sea salt
- For the filling:
- 1 cup ricotta cheese, well-drained
- 1/2 cup grated Parmigiano-Reggiano
- 1 cup sautéed spinach, finely chopped
- 1/4 teaspoon freshly grated nutmeg
- Salt and freshly ground black pepper to taste
Instructions
- Mix the Dough: On a clean work surface, mound the sifted flour and create a well at the center. Crack in the eggs, add olive oil and salt.Using a fork, gently whisk the eggs, gradually incorporating flour from the edges into the center until fully blended.
- Knead Until Smooth: With your hands, knead the dough for about 10 minutes until it transforms into a soft, elastic ball. If too sticky, dust lightly with flour-avoid overdoing it. Wrap in plastic and let rest for 30 minutes in a cool spot.
- Prepare the Filling: Combine ricotta, Parmigiano-Reggiano, chopped spinach, nutmeg, salt, and pepper in a bowl. Mix until creamy and uniformly blended. Refrigerate until ready to use.
- Roll the Pasta Sheets: Divide dough into quarters. Using a rolling pin or pasta machine, roll each quarter into a thin sheet-aim for near-translucent, roughly 1/16 inch thickness. Flour both sides occasionally to prevent sticking.
- Shape the Ravioli: Lay one sheet flat on the counter. spoon teaspoon-sized mounds of filling spaced about 1.5 inches apart. Lightly brush water around each mound as glue, then cover with a second sheet. Press gently around each filling to seal.
- Cut and Seal Edges: Using a ravioli cutter, sharp knife, or fluted pastry wheel, cut between the mounds into individual pillows. Press edges firmly to seal completely, ensuring no air pockets remain.
- Cook the Ravioli: Boil a large pot of salted water. Lower ravioli in batches to avoid overcrowding,stirring gently. Once they float to the surface, cook for an additional 2 minutes. Scoop out with a slotted spoon.
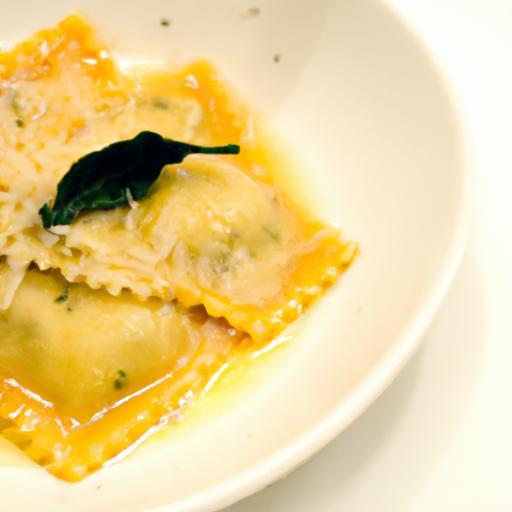
- Serve Immediately: Pair with a simple browned butter sage sauce, fresh tomato salad, or your favorite marinara. Garnish with cracked black pepper, grated Parmigiano, and a sprinkle of fresh herbs.
Tips for Success
- Flour selection matters: Use all-purpose flour for elasticity; incorporating a bit of durum or 00 flour can yield silkier sheets.
- Dough resting is essential: It relaxes gluten, making rolling easier and prevents shrinkage.
- Fillings should be dry: Excess moisture leads to soggy ravioli and compromised sealing.
- Seal gently but firmly: Use a fork or your fingers to press edges; trapped air leads to burst ravioli during cooking.
- Freeze uncooked ravioli on parchment before storage: Keeps shapes intact and allows for quick cooking later.
Serving Suggestions
plate your ravioli on warmed dishes drizzled with melted sage butter and a dusting of Parmigiano-Reggiano. Freshly cracked pepper and a small sprig of parsley or basil offer a delightful visual contrast. Pair with a crisp green salad and light Italian sparkling water for an impeccable meal experience.

Nutrition Information
| Nutrient | Per Serving |
|---|---|
| Calories | 380 kcal |
| protein | 18 g |
| Carbohydrates | 44 g |
| Fat | 10 g |
For more on homemade pasta techniques, check out our comprehensive Fresh Pasta Guide. For customary Italian culinary insights,the Italian Food forever website offers authentic cultural perspectives.
Q&A
Q&A: Crafting Perfect Homemade Ravioli – A Step-by-Step Guide


Q1: What are the essential ingredients for making fresh ravioli dough?
A: The foundation of perfect ravioli dough is simplicity. Typically, you need all-purpose flour, eggs, a pinch of salt, and a drizzle of olive oil.Some artisans include a bit of water or semolina flour for extra elasticity, but the classic trio of flour, eggs, and salt never fails to deliver that tender, yet firm pasta texture.
Q2: How can I ensure my ravioli dough has the right texture?
A: Achieving the ideal dough texture involves kneading until it’s smooth and slightly elastic-think of it as a soft, supple pillow. It shouldn’t be too sticky or dry. If the dough sticks to your fingers, add a sprinkle of flour. If it cracks or feels brittle,a few drops of water or olive oil can bring it back to life. Letting the dough rest wrapped in plastic for at least 30 minutes relaxes the gluten and makes rolling much easier.
Q3: What fillings work best for homemade ravioli?
A: The beauty of homemade ravioli is in its versatility. Creamy ricotta with fresh herbs, vibrant roasted butternut squash, earthy sautéed mushrooms, or a blend of spinach and goat cheese are all extraordinary choices. For a hearty twist, try combinations like roasted beet and feta or caramelized onion paired with root vegetables. The key is to balance moisture so the filling doesn’t leak when cooked.
Q4: How do I prevent my ravioli from bursting during cooking?
A: To keep your ravioli intact, seal the edges thoroughly. Use a bit of beaten egg or water as a “glue” along the pasta borders, then press firmly or crimp with a fork. Avoid overfilling, as too much filling can make the dough burst open. When boiling, use gentle simmering rather than a rolling boil, and cook just until they float-usually around 2 to 4 minutes.
Q5: Can I freeze homemade ravioli for later use?
A: Absolutely! Arrange freshly assembled ravioli on a flour-dusted tray so they don’t touch, and freeze until firm-about one to two hours. Once frozen, transfer them into airtight containers or bags.To cook from frozen, add a minute or two to the normal boiling time; they should still float when done.Q6: What are some creative finishing touches for serving ravioli?
A: Elevate your ravioli with vibrant sauces like a fresh tomato-basil coulis, a sage-infused brown butter drizzle, or a roasted garlic and almond pesto. Sprinkle toasted pine nuts or crunchy breadcrumbs on top for texture, and finish with fresh grated hard cheese like Parmigiano-Reggiano or a sprinkle of finely chopped fresh herbs. A pinch of lemon zest adds an unexpected burst of brightness.
Q7: Is it necessary to use a pasta machine for rolling out ravioli dough?
A: While a pasta machine makes rolling dough thinner and more uniform, it’s not essential. You can achieve great results with a rolling pin-just be patient and roll evenly from the center outward, rotating the dough often. The goal is to get sheets thin enough to see your hand through slightly but still strong enough to hold the filling.
Q8: How can I make my ravioli visually appealing?
A: Presentation is part of the charm! Use decorative ravioli molds or stamp your ravioli edges with patterned cutters for a whimsical touch. dust lightly with flour to prevent sticking and create a rustic look, or brush with olive oil for a glossy finish after cooking. Remember, each ravioli is a small edible parcel of love-make them look as inviting as they taste!
In Conclusion
As you fold those delicate pockets of dough around your carefully prepared filling, remember that crafting homemade ravioli is more than just a recipe-it’s an art form, a labor of love, and a celebration of patience and precision. With each tender bite, you savor not only the flavors but the journey from simple ingredients to an elegant dish bearing your personal touch. Armed with this step-by-step guide, you’re now ready to transform your kitchen into a ravioli atelier, where tradition meets creativity on every plate. So roll up your sleeves, embrace the flour-dusted mess, and let your culinary craftsmanship shine-because perfect homemade ravioli isn’t just made; it’s lovingly crafted.