ThereS something undeniably magical about the aroma of a freshly baked apple pie wafting through the kitchen-a comforting promise of warmth,tradition,and simple pleasures. Baking bliss isn’t just about following a recipe; it’s an art that blends carefully selected ingredients, time-honored techniques, and a touch of passion to create that perfect homemade apple pie. In this article, we’ll peel back the layers of this beloved dessert, exploring the nuances that transform a humble pie into a masterpiece of flaky crust and tender, spiced apples. Whether you’re a seasoned baker or a curious novice, prepare to embark on a flavorful journey that honors the timeless craft of making apple pie from scratch.
Baking Bliss: The Art of Perfect homemade Apple Pie begins with selecting the finest apples to craft a pie bursting with harmonious sweetness and just the right touch of tartness. Achieving this balance transforms a simple dessert into an unforgettable centerpiece that invites everyone to gather around the table and savor each flaky, buttery bite.
Choosing the Finest Apples for a Flavorful and Balanced Pie
When it comes to apple pie, using the right variety is essential for depth of flavor and perfect texture. Combining apples with contrasting profiles-like tart Granny Smith and sweet Honeycrisp-creates a nuanced filling that won’t turn mushy. Granny Smith apples hold their shape beautifully during baking, offering shining acidity, while Honeycrisp bring natural crispness and juices that keep the pie moist.For an extra twist, add a handful of Braeburn or Pink Lady apples, wich provide a subtle floral note and balance sweetness.
Look for apples that are firm with smooth, unblemished skin, and avoid any that feel soft or mealy. This ensures the filling stays “just right” after baking-tender yet with a slight bite.
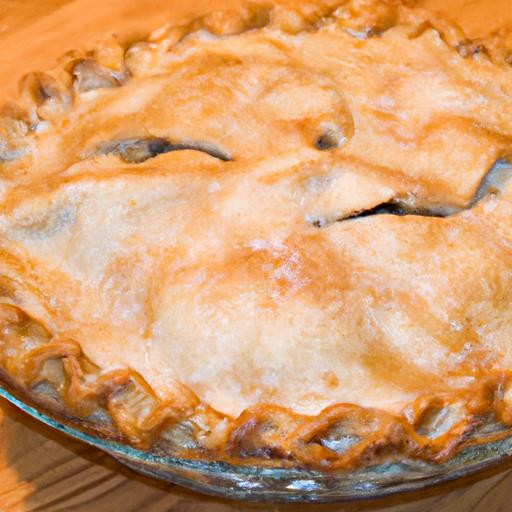
Mastering the Perfect Pie Crust for Flaky, Buttery Layers
Your pie’s foundation deserves as much attention as the filling. A homemade crust is the key to that coveted flaky texture that melts in your mouth. Use cold, unsalted butter cubed and chilled until just before mixing; small pockets of butter will create those delightful layers during baking. Incorporate ice-cold water sparingly-just until the dough holds-but not so much that it becomes sticky or dense.
Once combined, gently press the dough into discs, wrap in plastic, and refrigerate for at least an hour. This resting period relaxes gluten and solidifies fats, making the dough easier to roll out and less prone to shrinkage. Tip: Roll the dough between two sheets of parchment paper for a smooth surface and easy transfer to your pie pan.
Crafting the Ideal Spice Blend to Elevate Your Apple Filling
The magical aroma of an apple pie filling lies in the perfect spice blend. Classic combinations of ground cinnamon,freshly grated nutmeg,and a pinch of ground cloves create warmth and a hint of complexity. Adding a whisper of ground ginger or allspice can elevate the profile without overpowering the fruit.
don’t forget a splash of lemon juice-it brightens the flavors and keeps the apples from browning. A touch of vanilla extract enhances the sweetness naturally. Mix these spices evenly into the apple slices along with brown sugar to develop a caramelized, rich filling that fills your kitchen with irresistible fragrance.


Baking Techniques That ensure a golden Crust and juicy Interior
Preheat your oven thoroughly to around 425°F (220°C) to “set” the crust quickly, creating that signature puff and golden hue. After placing the pie on the middle rack, bake for 15 minutes before lowering the temperature to 350°F (175°C) to gently finish baking without burning.
Using a pie shield or strips of foil around the edges halfway through baking prevents over-browning while allowing the bottom crust to crisp evenly. to avoid a soggy base, bake your pie on a preheated baking sheet to catch juices and promote bottom crust browning. Vent your top crust with slits or a lattice design to let steam escape, preserving the filling’s juiciness.

Prep and Cook Time
- Preparation: 30 minutes
- Chilling Dough: 1 hour
- Baking: 45-55 minutes
- Total Time: Approximately 2 hours 30 minutes
Yield
Serves 8 generous slices
Difficulty Level
Medium – Requires basic baking skills and patience
Ingredients
- 2 ½ cups all-purpose flour, sifted
- 1 cup unsalted butter, cubed and chilled
- ½ tsp salt
- 6-8 tbsp ice-cold water
- 6 cups mixed apples (Granny Smith, Honeycrisp, Braeburn), peeled, cored, and sliced
- ¾ cup light brown sugar, packed
- 2 tsp ground cinnamon
- ½ tsp freshly grated nutmeg
- ¼ tsp ground cloves
- ¼ tsp ground ginger (optional)
- 1 tbsp lemon juice
- 1 tsp pure vanilla extract
- 1 tbsp all-purpose flour (to thicken filling)
- 1 egg beaten, for egg wash
- Coarse sugar for sprinkling (optional)
instructions
- Prepare the crust: In a large bowl, combine the sifted flour and salt. add the chilled butter cubes and use a pastry cutter or your fingers to work the butter into the flour until the mixture resembles coarse crumbs with pea-sized bits.
- Add cold water: Gradually sprinkle ice water one tablespoon at a time, mixing gently, until dough begins to hold together without sticking. Do not overmix.
- Chill the dough: Divide the dough into two discs. Wrap each tightly in plastic wrap and refrigerate for at least 1 hour.
- Prepare the filling: In a large bowl, toss the sliced apples with lemon juice, brown sugar, cinnamon, nutmeg, cloves, ginger, vanilla, and flour. Ensure all slices are evenly coated.
- Roll out the bottom crust: On a lightly floured surface or between parchment sheets, roll one dough disc into a 12-inch circle. Transfer to a 9-inch pie plate, easing it in without stretching.
- Fill the pie: Spoon the apple mixture into the crust, mounding slightly in the center.
- Top crust: Roll out the second dough disc similarly, then either place it over the filling or create a lattice design. Trim excess dough and crimp edges to seal.
- Egg wash: brush the top crust with beaten egg and sprinkle coarse sugar for a sparkling, golden finish.
- Vent: Cut slits in the top crust if using a full sheet,allowing steam to escape.
- bake: Place the pie on a preheated baking sheet and bake at 425°F (220°C) for 15 minutes. Reduce oven temperature to 350°F (175°C), shield edges with foil, and bake for an additional 30-40 minutes until the crust is golden and filling bubbles.
- Cool: Let the pie rest for at least 2 hours before slicing to allow juices to thicken.
Tips for Success
- Use a mix of crisp and tart apples to maintain texture and flavor depth.
- Keep ingredients cold for the flakiest crust layers.
- Don’t skip chilling the dough; it prevents shrinkage and tough crust.
- Adjust spices to your preference-less cinnamon for a milder pie or add a pinch of cardamom for an exotic twist.
- Bake your pie on the lowest oven rack for a crisp bottom crust.
- Make-ahead tip: You can prepare the crust and filling separately a day in advance and assemble just before baking.
Serving Suggestions
Serve warm slices topped with a generous scoop of vanilla bean ice cream or a dollop of fresh whipped cream. Garnish with a sprinkle of cinnamon or a few toasted chopped walnuts for added texture contrast. A drizzle of caramel sauce can add a luscious finishing touch, perfect for elevating this beloved classic.
| Nutrient | Per Serving |
|---|---|
| Calories | 350 kcal |
| Protein | 3 g |
| Carbohydrates | 52 g |
| Fat | 14 g |
Explore more delightful desserts by visiting our Classic Desserts Collection. For tips on apple varieties, USApple.org offers an authoritative guide to get you started on choosing the perfect fruit for any baking adventure.
Q&A
Q&A: Baking Bliss: The art of Perfect Homemade Apple Pie
Q1: What makes a homemade apple pie truly “perfect”?
A1: The magic of a perfect homemade apple pie lies in harmony-a balance between a flaky, buttery crust and a filling bursting with tender, spiced apples. it’s about texture and flavor singing together: crisp edges,melt-in-your-mouth interior,and that nostalgic aroma that fills your kitchen with warmth.
Q2: Which apple varieties are best suited for apple pie?
A2: Apples that hold their shape when baked are the stars of any apple pie. Tart and firm varieties like Granny Smith, Honeycrisp, and Braeburn create a lively contrast to the sweetness of the sugar and spices, ensuring each bite is satisfyingly crisp yet tender.Q3: How do I achieve a flaky pie crust without it becoming tough?
A3: The secret to flaky crust is cold ingredients and gentle handling. Use chilled butter and ice-cold water, and avoid overmixing the dough. Keeping everything cold prevents the butter from melting prematurely, which creates those coveted flaky layers once baked.
Q4: What spices best enhance apple pie filling?
A4: Classic warm spices like cinnamon, nutmeg, and a dash of allspice can transform simple apples into a fragrant symphony. A pinch of ground ginger or cardamom adds a subtle complexity that surprises and delights the palate.
Q5: Should I peel the apples before baking?
A5: Peeling is generally preferred to achieve a smooth, tender filling.The skin can sometimes separate and become tough during baking,disrupting the filling’s texture. However, for a rustic feel, thinly sliced, unpeeled apples can add a wholesome, hearty chew.
Q6: How can I prevent the bottom crust from becoming soggy?
A6: To keep the bottom crust crisp, try these tricks: sprinkle a thin layer of ground nuts or breadcrumbs before adding the filling to absorb excess moisture, blind bake the crust partially, or bake the pie on a lower oven rack to ensure even heat circulation and thorough crust baking.
Q7: Is there a best way to slice apples for pie filling?
A7: Uniform slices-about 1/4-inch thick-work best.This size allows the apples to cook evenly, softening just enough without turning mushy. Slices that are to thick remain crunchy, while too thin can dissolve into the syrupy filling.
Q8: How long should the apple pie bake to achieve that golden perfection?
A8: Generally, a 45-60 minute bake at 375°F (190°C) is ideal. The crust should be golden brown and the filling bubbling through the vents. tent the edges with foil if they brown too quickly to avoid burning while the filling cooks through.
Q9: Can I prepare apple pie in advance?
A9: Absolutely! Apple pie often tastes even better after resting. Bake it a day ahead and let it cool entirely before storing at room temperature or refrigerating. Just warm it gently before serving to recapture that fresh-baked aroma and perfect texture.Q10: What’s a creative twist to add to my traditional apple pie?
A10: Amp up the cozy factor by adding a layer of caramel or a handful of toasted pecans under the apple filling. Alternatively, infuse the crust with a hint of vanilla or orange zest for a subtle, unexpected pop of flavor that elevates the classic recipe.
Baking the perfect homemade apple pie is an art filled with love, patience, and just the right touch of culinary magic. Happy baking!
In Summary
As the aroma of golden, cinnamon-kissed apples fills your kitchen and the flaky crust yields to the soft, tender fruit within, you realize that baking the perfect homemade apple pie is more than just a recipe-it’s an experience, a celebration of patience, precision, and passion. Whether enjoyed warm from the oven with a scoop of creamy vanilla ice cream or savored later alongside a cup of tea, this timeless dessert connects us to traditions past and moments shared. With every slice, you’re not only indulging in a tasty treat but also embracing the art of baking bliss-where simple ingredients transform into something truly unusual. So, gather your ingredients, don your apron, and let your own apple pie journey begin-as perfection, after all, is best served homemade.